auther: abinng date: 2026-05-09 16:00
createDate:2026-05-09 16:00
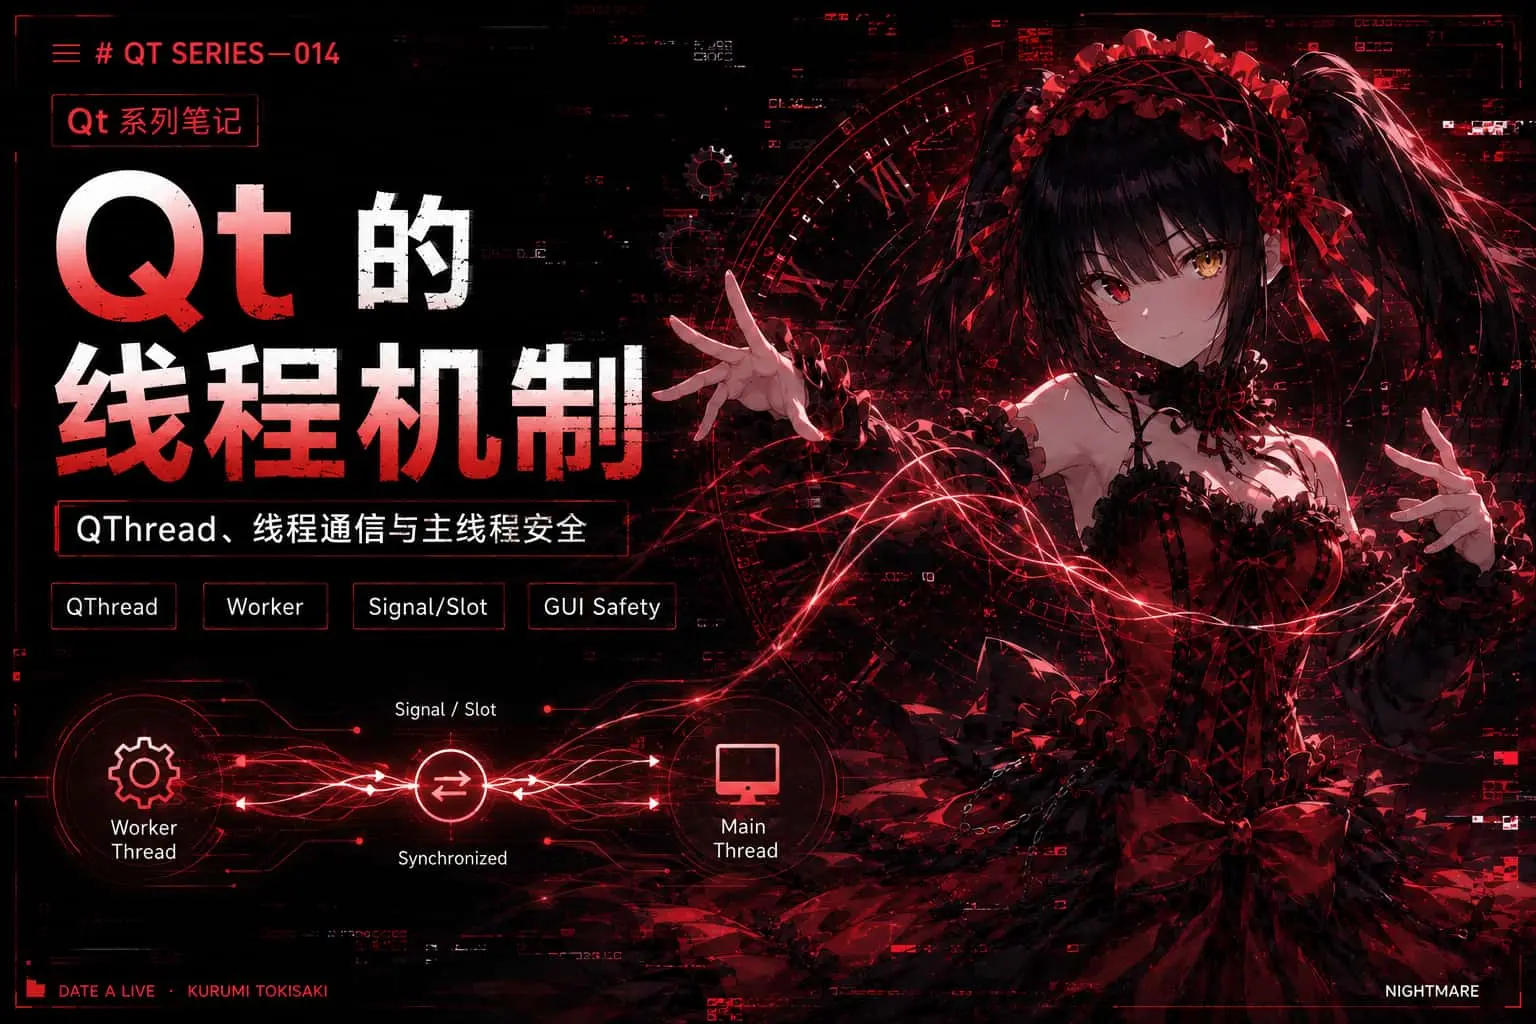
我们知道,一些耗时的操作,如文件读写、网络请求、复杂计算等,如果在主线程中执行,可能导致界面无响应,所以Qt也引入了多线程,提供了不依赖平台的管理线程的方法
一些注意事项:
- 通常主线程负责几乎所有GUI的操作,如果其他线程尝试直接访问这些控件,会导致程序崩溃,此时推荐使用信号和槽机制
从一个错误案例入手
点击展开
1
2
3
4
5
6
7
8
9
10
| #include <QApplication>
#include "ErrorForm.h"
int main(int argc, char *argv[]) {
QApplication a(argc, argv);
ErrorForm win;
win.show();
return QApplication::exec();
}
|
1
2
3
4
5
6
7
8
9
10
11
12
13
14
15
16
17
18
19
| #ifndef EX18_THREADBASE_ERRORFORM_H
#define EX18_THREADBASE_ERRORFORM_H
#include <QWidget>
#include <QPushButton>
#include <QLCDNumber>
class ErrorForm : public QWidget {
public:
explicit ErrorForm(QWidget *parent = nullptr);
~ErrorForm() override = default;
public slots:
void do_error_show();
private:
QPushButton *btnStart;
QLCDNumber *lcdNum;
};
#endif
|
1
2
3
4
5
6
7
8
9
10
11
12
13
14
15
16
17
18
19
20
21
22
23
24
25
26
27
28
29
30
31
32
33
| #include "ErrorForm.h"
#include <QVBOXLayout>
#include <QThread>
ErrorForm::ErrorForm(QWidget *parent) : QWidget(parent) {
auto main_layout = new QVBoxLayout(this);
btnStart = new QPushButton("Start");
lcdNum = new QLCDNumber(this);
lcdNum->setDigitCount(2);
lcdNum->setSegmentStyle(QLCDNumber::Flat);
main_layout->addWidget(lcdNum);
main_layout->addWidget(btnStart);
setLayout(main_layout);
resize(300, 300);
connect(btnStart, &QPushButton::clicked, this, &ErrorForm::do_error_show);
}
void ErrorForm::do_error_show() {
int i = 0;
while (true) {
lcdNum->display(i++);
if (i > 60) {
break;
}
QThread::msleep(500);
}
}
|
运行程序,我们会发现lcd会一直显示0,此时用鼠标乱点几下窗口,就会出现经典的未响应状态
为什么呢?
Qt 是事件驱动的,执行 QApplication::exec()
后,就会不断地从操作系统接收事件,并分发给对应的控件
display() 相当于通知lcdNum,是产生了一个重绘事件(Paint
Event)到主线程的事件队列中,等待处理。注意,此时我们只有一个主线程。
但是我们的主线程正在执行 do_error_show
函数呢,等执行结束后,即30s之后,才会处理队列后面的重绘事件
所以我们就需要多线程来处理了,Qt 提供了两种多线程的使用方式
方式1
QThread 类中有一个 run()
方法,当启动该线程后,就会从该方法开始执行,故我们重写该方法即可
主要的逻辑就是,我们将加法的逻辑放到线程中执行,然后更新lcd显示,那么怎么更新呢?
两种想法:
- 在
MyThread 类中,加一个成员
mptr_lcdNumber,之后在 ErrorForm
构造中创建线程对象并把线程对象的成员 mptr_lcdNumber 赋值为
ErrorForm 类的成员 lcdNum ,之后就可以直接在
MyThread 中的 run 中直接进行
mptr_lcdNumber->display(i++); 了。
但是,我们上面提到过其他线程不能访问GUI线程(即主线程)的资源,会直接程序崩溃
;所以这么干是不行的!
- 在
run
中通过向主线程发射信号,同时传递加法后的数字,以此来进行线程间的通信,如下:
点击展开
1
2
3
4
5
6
7
8
9
10
| #include <QApplication>
#include "ErrorForm.h"
int main(int argc, char *argv[]) {
QApplication a(argc, argv);
ErrorForm win;
win.show();
return QApplication::exec();
}
|
1
2
3
4
5
6
7
8
9
10
11
12
13
14
15
16
17
18
19
20
21
22
23
24
25
26
| #ifndef EX18_THREADBASE_ERRORFORM_H
#define EX18_THREADBASE_ERRORFORM_H
#include <QWidget>
#include <QPushButton>
#include <QLCDNumber>
#include <QLabel>
#include "MyThread.h"
class ErrorForm : public QWidget {
public:
explicit ErrorForm(QWidget *parent = nullptr);
~ErrorForm() override = default;
public slots:
void do_error_show();
void do_label_show(QString data);
void do_lcd_show(int data);
void do_finish_work();
private:
MyThread *m_thread;
QPushButton *btnStart;
QLCDNumber *lcdNum;
bool isRunning;
};
#endif
|
1
2
3
4
5
6
7
8
9
10
11
12
13
14
15
16
17
18
19
20
21
22
23
24
25
26
27
28
29
30
31
32
33
34
35
36
37
38
39
40
41
42
43
44
45
46
47
48
49
50
51
52
53
54
55
56
57
58
| #include "ErrorForm.h"
#include <QVBOXLayout>
#include <QThread>
ErrorForm::ErrorForm(QWidget *parent) : QWidget(parent), isRunning(false) {
auto main_layout = new QVBoxLayout(this);
btnStart = new QPushButton("Start");
lcdNum = new QLCDNumber(this);
lcdNum->setDigitCount(2);
lcdNum->setSegmentStyle(QLCDNumber::Flat);
main_layout->addWidget(lcdNum);
main_layout->addWidget(btnStart);
setLayout(main_layout);
resize(300, 300);
connect(btnStart, &QPushButton::clicked, [=]() {
if (!isRunning) {
m_thread = new MyThread(30);
connect(m_thread, &MyThread::sendNum, this, &ErrorForm::do_lcd_show);
connect(m_thread, &QThread::finished, this, &ErrorForm::do_finish_work);
m_thread->start();
isRunning = true;
btnStart->setText("Stop");
} else {
m_thread->requestInterruption();
isRunning = false;
btnStart->setEnabled(false);
}
});
}
void ErrorForm::do_error_show() {
int i = 0;
while (true) {
lcdNum->display(i++);
if (i > 60) {
break;
}
QThread::msleep(500);
}
}
void ErrorForm::do_lcd_show(int data) {
lcdNum->display(data);
}
void ErrorForm::do_finish_work() {
m_thread->wait();
m_thread->deleteLater();
btnStart->setText("Start");
btnStart->setEnabled(true);
isRunning = false;
}
|
1
2
3
4
5
6
7
8
9
10
11
12
13
14
15
16
17
18
19
20
21
| #ifndef EX18_THREADBASE_MYTHREAD_H
#define EX18_THREADBASE_MYTHREAD_H
#include <QLabel>
#include <QThread>
#include <QLCDNumber>
class MyThread : public QThread {
Q_OBJECT
public:
MyThread(int num = 60, QObject *parent = nullptr);
~MyThread() override;
signals:
void sendNum(int x);
protected:
void run() override;
private:
int m_num;
};
#endif
|
1
2
3
4
5
6
7
8
9
10
11
12
13
14
15
16
17
18
19
20
21
22
23
24
| #include <QDebug>
#include "MyThread.h"
MyThread::MyThread(int num, QObject *parent) : QThread(parent), m_num(num) {
}
MyThread::~MyThread() {
qDebug() << "~MyThread()";
}
void MyThread::run() {
static int i = 0;
while (i <= m_num) {
emit sendNum(i++);
if (isInterruptionRequested()) {
qDebug() << "线程被临时终止";
break;
}
msleep(100);
}
qDebug() << "线程工作完成";
}
|
这种方式并不是很推荐,因为这么干相当于直接写死了这个线程就得干这个,不能干其他
当然也不是说不能用这个方式,当我们确定了某个线程就只干这一件事,也可以这么用的
方式2
这种方式不重写 run 方法,此时 run
中官方的实现是 QThread::exec 开启一个事件循环
此时通过 moveToThread(thread) 交给 thread 执行
将 QThread
作为线程的管理者,而线程具体做什么,交给另外的对象来实现
一般设计工作类时,主要考虑设计哪些槽方法,送入到线程事件循环的队列里,槽方法返回后,线程时继续运行的,等待下一个事件发生
- 使用
connect 函数 Qt::QueuedConnection
方式连接跨线程的槽通信
- 利用元对象系统
QMetaObject::invokeMethod
实现事件的发送
这里的 Qt::QueuedConnection 是 connect
函数的第五个参数中的一个方式,接下来介绍一下第五个参数:
connect 函数的第五个参数是
Qt::ConnectionType。虽然平时写代码很少去手动填它(因为它有默认值)
| 枚举值 |
名称 |
描述 |
Qt::AutoConnection |
自动连接 (默认) |
如果信号发送者和接收者在同一线程,等同于
Direct;如果不在同一线程,等同于 Queued。 |
Qt::DirectConnection |
直接连接 |
像直接调用函数一样。信号发射时,槽函数立即在发送者所在的线程执行。 |
Qt::QueuedConnection |
队列连接 |
信号被包装成一个事件丢进接收者的“事件队列”里。槽函数在接收者所在的线程空闲时执行。 |
Qt::BlockingQueuedConnection |
阻塞队列连接 |
类似
Queued,但发送者线程会阻塞,直到接收者线程把槽函数跑完。绝不能在同一线程使用,否则死锁。 |
Qt::UniqueConnection |
唯一连接 |
这是一个标志位,可以和其他模式组合 |
这里为什么选择用 Qt::QueuedConnection ?
假设你在子线程里处理大量数据,频繁发射信号给主线程更新 UI。如果你用
DirectConnection,子线程会强制在自己的线程里去操作主线程的
UI 控件,这会导致程序直接崩溃。使用 QueuedConnection 确保了
UI 操作永远回到主线程执行。
点击展开
1
2
3
4
5
6
7
8
9
10
| #include <QApplication>
#include "MainWin.h"
int main(int argc, char* argv[])
{
QApplication a(argc, argv);
MainWin win;
win.show();
return QApplication::exec();
}
|
1
2
3
4
5
6
7
8
9
10
11
12
13
14
15
16
17
18
19
20
21
22
23
24
25
26
27
28
| #ifndef EX20_MYTHREADMOVE_MAINWIN_H
#define EX20_MYTHREADMOVE_MAINWIN_H
#include <QWidget>
#include <QLCDNumber>
#include <QPushButton>
#include <QThread>
#include "Worker.h"
class MainWin : public QWidget
{
public:
explicit MainWin(QWidget *parent = nullptr);
~MainWin() override;
public slots:
void do_btn_work();
void do_lcd_show(int value);
void do_task_over();
private:
void initWin();
QLCDNumber* m_pLcdShow;
QPushButton* m_pBtnController;
QThread* m_pThread;
Worker* m_pWorker;
bool m_bIsRunning;
};
#endif
|
1
2
3
4
5
6
7
8
9
10
11
12
13
14
15
16
17
18
19
20
21
22
23
24
25
26
27
28
29
30
31
32
33
34
35
36
37
38
39
40
41
42
43
44
45
46
47
48
49
50
51
52
53
54
55
56
57
58
59
60
61
62
| #include "MainWin.h"
#include <QVBoxLayout>
#include <QDebug>
MainWin::MainWin(QWidget *parent) : QWidget(parent), m_pLcdShow(nullptr), m_pBtnController(nullptr),
m_pWorker(nullptr), m_pThread(new QThread(this))
{
initWin();
qDebug() << "GUI线程号:" << QThread::currentThreadId();
m_pWorker = new Worker();
m_pWorker->moveToThread(m_pThread);
m_pThread->start();
connect(m_pWorker, &Worker::valueReady, this, &MainWin::do_lcd_show);
connect(m_pWorker, &Worker::overReady, this, &MainWin::do_task_over);
connect(m_pBtnController, &QPushButton::clicked, this, &MainWin::do_btn_work);
connect(m_pThread, &QThread::finished, m_pWorker, &QObject::deleteLater);
}
MainWin::~MainWin()
{
qDebug() << __PRETTY_FUNCTION__;
m_pThread->quit();
m_pThread->wait();
}
void MainWin::do_btn_work()
{
if (!m_bIsRunning) {
QMetaObject::invokeMethod(m_pWorker, "doWork", Qt::QueuedConnection);
m_bIsRunning = true;
m_pBtnController->setText("停止");
} else {
m_pWorker->doExit();
}
}
void MainWin::do_lcd_show(int value)
{
m_pLcdShow->display(value);
}
void MainWin::do_task_over()
{
m_pBtnController->setText("开始");
m_bIsRunning = false;
}
void MainWin::initWin()
{
setGeometry(100, 100, 400, 400);
auto main_layout = new QVBoxLayout(this);
m_pLcdShow = new QLCDNumber(this);
m_pBtnController = new QPushButton("开始", this);
m_pLcdShow->setDigitCount(2);
m_pLcdShow->setSegmentStyle(QLCDNumber::Flat);
main_layout->addWidget(m_pLcdShow);
main_layout->addWidget(m_pBtnController);
setLayout(main_layout);
}
|
1
2
3
4
5
6
7
8
9
10
11
12
13
14
15
16
17
18
19
20
21
22
23
| #ifndef EX20_MYTHREADMOVE_WORKER_H
#define EX20_MYTHREADMOVE_WORKER_H
#include <QObject>
class Worker : public QObject
{
Q_OBJECT
public:
explicit Worker(int max = 60, QObject *parent = nullptr);
~Worker() override;
public slots:
void doWork();
void doExit();
signals:
void valueReady(int value);
void overReady();
private:
int m_nMaxNum;
std::atomic<bool> m_bIsRunning{false};
};
#endif
|
1
2
3
4
5
6
7
8
9
10
11
12
13
14
15
16
17
18
19
20
21
22
| #ifndef EX20_MYTHREADMOVE_WORKER_H
#define EX20_MYTHREADMOVE_WORKER_H
#include <QObject>
class Worker : public QObject
{
Q_OBJECT
public:
explicit Worker(int max = 60, QObject *parent = nullptr);
~Worker() override;
public slots:
void doWork();
void doExit();
signals:
void valueReady(int value);
void overReady();
private:
int m_nMaxNum;
std::atomic<bool> m_bIsRunning{false};
};
#endif
|